What are the Key Components to a Successful Agitator Run?
In a time of low oil prices, it doesn’t always make economic sense to some operators to run a rotary steerable system, as beneficial as they can be in terms of smoother wellbores and higher sustained ROP. Many clients turn to straightforward “motor and mwd” systems, and find they are cost effective, reliable, and provide sufficient quality wellbores for their casing programs. The issue becomes what are the limits, in terms of trajectory complexity and step-out, that an agitator can be used, and how do you judge the effectiveness of the tool?
HXR’s Drilling Specialists use a graphical method to measure agitator efficiency and placement. What some may not know is that there is a fairly small input window in which your agitator is working at peak performance. The window of opportunity for optimization gets smaller each time one of the key components change. Here are the key components to a successful agitator run:
1. Planning: Ensure your well’s side forces/axial forces have been modeled for the proposed wellplan, and use your judgement, and past experience, in placing the agitator in a position in the string where it will do most good. It is important to note that an agitator causes significant vibration for quite a distance both ahead, and behind, the tool itself. This should be used to your benefit – try to place the agitator so that it literally shakes as much pipe as possible. This placement will change depending on your situation. Are you in a straight or low-angle hole, mostly rotating, and you want to “smooth out” some of the weight transfer and increase ROP? If so, you may want to place the tool close above the BHA. Are you in a long, laid out lateral and you need to slide? You will want to put it several thousand feet behind the bit, try to vibrate as much of the string as possible, in both directions, breaking some of the static drag force; if you can transmit up into the build, where side forces are higher, the better off you will be.
2. Power: Coordinate the desired flow rates of your MWD/PWD vendor with your agitator vendor. If you set your agitator up for a flow range of 200-250 gpm but your MWD tools are set up for 300-500 gpm, you have failed before you’ve ever started drilling.
3. Hydraulics: Fluid rheology and weight also play a part in ensuring the agitator is getting the fluid inputs needed to provide optimum power, but more importantly, having the mud get out of control and forcing a flowrate change is a death knell; you may be hitting peak performance here and there, but you are never maintaining it.

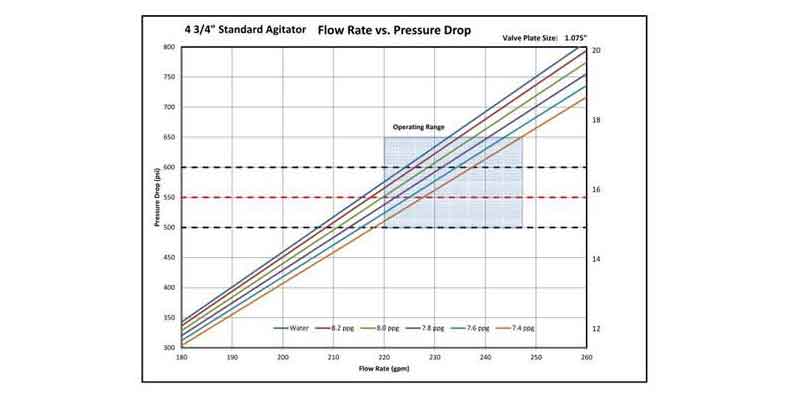
Above is a standard performance table for a 4.75” agitator. You can see exactly how small the operating window actually is. This also shows you the effect of changing the key components.
Agitator placement is still a very openly debated (and hotly contested…) issue field wide. Some people want it as close to the BHA as possible to break friction created from that component alone. Some people view buckling as the largest generator of drag. In the end, it is best to have a Drilling Specialist onboard to calculate the magnitude and position of sinusoidal and helical buckling forces. Placement recommendations often vary based on past experience. Whichever route you decide on, you should document the successes and failures to optimize for the next well. You can of course take the path of running one agitator near the BHA and one up-hole where buckling risk is highest. We do not see this very often but in all honesty, it’s probably the best case scenario if you absolutely plan on getting to TD while relying on an agitator. But you better have the pump to do it – you’re looking at ~500 psi Pd p/tool…
Now that we know how to plan for success, it is equally important to verify the success. How do we know the tool is working downhole? Maybe you can put your hand on the pipe and feel it at surface, or hear a low-frequency thrumming sound that, with experience, you’ll learn to associate with the tool. But how much “extra weight” does it provide you to slide with? HXR was tasked with verifying the success and force of the agitator on one of our client projects. At the time, it was unheard of to measure the amount of force “applied” downhole by the agitator. This is how we do it:
1. Record the average S/O weight with pumps off.
2. Pick back up (~45’), and turn the pumps on to drilling rate.
3. S/O at the same rate and to the same position on the pipe as you did without pumps.
4. Wait ~1 minute, or until you notice the hookload has stabilized. Record this weight.
5. Depending on your hole size, the magnitude of hydraulic lift will vary, but in general, the difference between the pumps on and off hookload is how much weight the agitator is allowing to be translated to the bit by breaking static friction up hole.
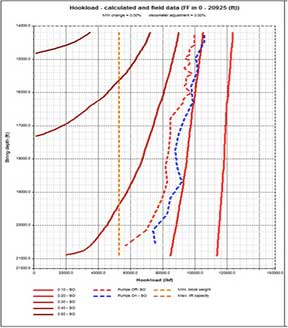
Example of an agitator run giving in the range of 5-10 kips on average weight increase.
HXR personnel have seen upwards of 25k in added weight; one time, after stopping ~4 from bottom to wait for the hookload to come up (and walking over to the coffee pot…), we heard the SPP alarm go off – in that short time, the agitator had shook the bit to bottom, and put enough weight on it that the motor stalled! Yeah, the derrickman was grumbling as he changed popoffs; DD was grinning like a fool… He knew he had a good tool in the hole, and there was excellent placement.
We have also seen very low weight gains, in the 5k range. It is important to ensure you are running the correct agitator – there are different kinds, and all can be “tuned” for more or less vibration. If you’re worried about what the MWD guys are going to say, and you want a “weak tune” – don’t even bother. The idea is to get a tool in there that hits hard, that will give the DD 20k or so of weight to drill with, fast toolfaces, and even application of the weight, so the DD can control the toolface ones he/she is on bottom and steering ahead.
You WANT lights to come out of the derrick when you surface test…
Note to new DD’s:
An agitator, as fantastic as it is, is only so powerful. It can NOT unbuckle the string – it can only break some friction and allow you to put more weight than you normally would be able to get onto the bit. If you follow the steps above, and you see that the agitator, after a minute, will allow 20k to translate onto the bit (measured at surface on the Martin-Decker), then that is as fast as you can drill: Whatever ROP 20k in 1 minute will allow.
That is key, folks – you can’t stack 60k on the bit, well above what the agitator can “shake off”, and expect to drill – you won’t move an inch. You’re buckled. The bit will drill off, and there you will sit. You can ONLY drill as fast as the agitator will shake off weight.
We call it a “shake test”. After you’ve calculated how much weight the agitator will give you, get on bottom, and slowly work the weight up to that point, putting in quarter turns as necessary (you likely won’t need many…). Say it gives you 20k – hold that amount on the bit. How fast is your ROP? THAT is likely where you’ll sit, for the entire slide. You can push harder, but you likely won’t see much of an increase (after the ‘fast foot” seen when slacking off the extra weight). Put too much, you’ll buckle – ROP will go to zero.
Posted on: March 10th, 2016
Filed under: Blog